Tactical Domination AKA "Chase the Alchemist OP Game"
| ||||||||||||
|---|---|---|---|---|---|---|---|---|---|---|---|---|
|


Introduction[ | ]
Good day, I am DrCptSxyPnts, and today I would like to introduce you to my A-Team for Champs: Battlegrounds. It is my hope that throughout this guide you will learn how to use my setup, or better your own play with any other setup you use. We will discuss the fundamentals, as well as advanced and competitive play. As a bonus we will also talk a little bit about the campaign. I am currently at 86/90 stars using only this comp.
What Qualifies Me?[ | ]
- I'm a Doctor.
- I'm a Captain.
- My sexy pants.
- My victory of the first Tactical Domination tournament, my success on the Quark Stream/Vs Developers, My victories in the first Tournament of Commanders.
- My queue times.
To summarize I have had a lot of success thus far with the game, and particularly with this set-up. A lot of people asked for it, so I've taken my time in trying to deliver as quality a guide as possible with the intention of helping you improve your play even if you don't end up using the exact composition. In the following section I am going to break things down on what each member of my squad does, and how they are used with synergy in my play.
Foundation[ | ]
I would best describe the DrCpt's Sexy Squad as a Hard-nose, Aggressive, Center control oriented squad. That is to say, the effectiveness of the team revolves pretty heavily around taking the middle, and controlling more energy tiles than your opponent. The key to quality of play with this team comes down to three key concepts: your FIRST MOVE, your ability to CYCLE champs, and your CONTROL. CYCLING is the process of moving a champion out of a location in order to replace it with another champion that can better utilize the position. We will approach this concept again later.
Champion Explanations[ | ]
Knight[ | ]
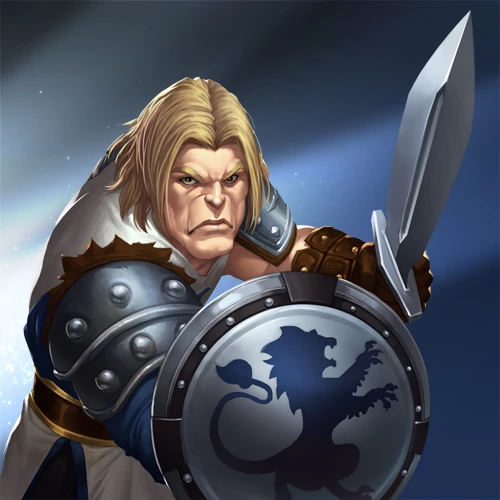
Our Knight is our front line, he is sent in first to take beneficial tiles, absorb damage, and move enemies off beneficial tiles they own. In general he is responsible for starting cycle trains. As the game progresses, if you are in control, the knight becomes less essential, and should be used to maintain your position, harass, and ![]() healer/nukers.
healer/nukers. ![]() a healer/nuker forces them to attack you so that they aren't healing/killing someone in your squad. This will open your units up to an easy kill. Harassing comes in the form of doing damage to squishy or low health targets, and knocking enemies out of position. For instance, using
a healer/nuker forces them to attack you so that they aren't healing/killing someone in your squad. This will open your units up to an easy kill. Harassing comes in the form of doing damage to squishy or low health targets, and knocking enemies out of position. For instance, using ![]() to move someone of their back line energy tile, forcing him to waste energy moving back, or cycling someone else to take it. Sometimes the knight is even valueable sitting idly in a position that blocks a pull or push while the rest of your squads removes or moves the threat. The Knight's high mobility allows him to be in a useless position one second, then move him into an attack range followed up with his
to move someone of their back line energy tile, forcing him to waste energy moving back, or cycling someone else to take it. Sometimes the knight is even valueable sitting idly in a position that blocks a pull or push while the rest of your squads removes or moves the threat. The Knight's high mobility allows him to be in a useless position one second, then move him into an attack range followed up with his ![]() the next second. The knight's mobility should also be used to deny paths from the enemy to positions that might benefit them. An example of this is placing a knight between an Archer and high ground. It forces the archer to move into a dangerous area if he wants the extra attack range.
the next second. The knight's mobility should also be used to deny paths from the enemy to positions that might benefit them. An example of this is placing a knight between an Archer and high ground. It forces the archer to move into a dangerous area if he wants the extra attack range.
Axeman[ | ]

The Axeman serves the purpose of being both our off-tank, and our second source of high damage output. The axeman's high mobility like the knight puts him in position to take and deny worthwhile positions. Pretty quickly after taking beneficial position for the team, you will want to move the axeman into a beneficial position for the axeman. That is to say, the axeman should try and be able to hit as many people possible with his ![]() , while still keeping the team's position in mind.
, while still keeping the team's position in mind. ![]() is good to use when you have the time and will be able to make use of it(don't use it with low health if you don't have heals coming, because he will die before you can make use of it), It is important to hit multiple targets with
is good to use when you have the time and will be able to make use of it(don't use it with low health if you don't have heals coming, because he will die before you can make use of it), It is important to hit multiple targets with ![]() , because the composition of the team lacks a lot of burst damage, so hitting multiple targets allows you to be able to choose a target to burst down. Examples of a time you are okay not cleaving multiple targets is if you have a enemy target surrounded attacking with multiple champs at once, if your damage on a single target is enough to kill or set up a kill from another combination such as with the alchemist's
, because the composition of the team lacks a lot of burst damage, so hitting multiple targets allows you to be able to choose a target to burst down. Examples of a time you are okay not cleaving multiple targets is if you have a enemy target surrounded attacking with multiple champs at once, if your damage on a single target is enough to kill or set up a kill from another combination such as with the alchemist's ![]() . SEE ALCHEMIST BELOW.
. SEE ALCHEMIST BELOW.
Alchemist[ | ]
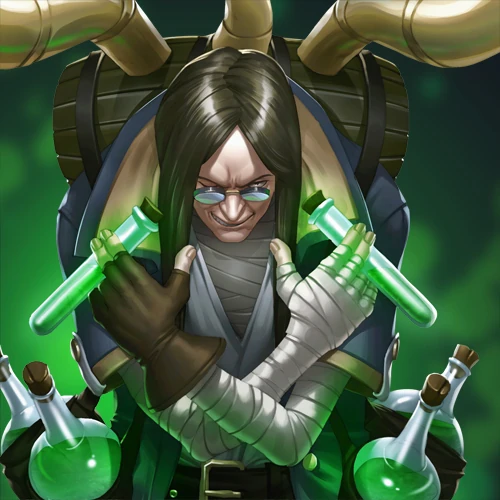
The Alchemist gets the credit of being my favorite part and usually most used member of this squad. He is seemingly the largest threat, and does the most damage when left unchecked. I start the alchemist in the front line, but he by no means should be left in the front line for long without a lot of support. This position is to allow him the quick jump out of the gate, and is backed by the bandit who is able to move quickly ahead of him regardless. In maps like Ether Ridge and Merit's Knoll the alchemist can jump on an energy tile on his first move(depending on starting position). I like to get the alchemist up and running as fast as possible because doing fast AoE damage to the enemy forces them to retreat giving you an easy path so your desired position on the map. While I mentioned I don't always use ![]() for the axeman, I try and use
for the axeman, I try and use ![]() as much as possible. When i picked up the alchemist I didn't know you could throw it on empty spaces between enemies to hit multiple targets, but finding this out completely changed the alchemist's capabilities in my squad. Using
as much as possible. When i picked up the alchemist I didn't know you could throw it on empty spaces between enemies to hit multiple targets, but finding this out completely changed the alchemist's capabilities in my squad. Using ![]() to hit multiple targets is great, because the oil debuff lasts until that enemy dies or is hit by an
to hit multiple targets is great, because the oil debuff lasts until that enemy dies or is hit by an ![]() . This means even if an enemy runs aware from the
. This means even if an enemy runs aware from the ![]() , he will still be vulnerable later when he is back in a position to be hit. Having oil all over the place makes it hard for the enemy to know who you are looking at as a primary target. When you hit multiple people with
, he will still be vulnerable later when he is back in a position to be hit. Having oil all over the place makes it hard for the enemy to know who you are looking at as a primary target. When you hit multiple people with ![]() , and then hit those same targets with an
, and then hit those same targets with an ![]() , it is often impossible for the enemy to sustain both those champs in that position, so even if your primary target does survive and is healed, you can often still kill the secondary and/or tertiary target. The reason the axeman needs to be hitting multiple targets with his
, it is often impossible for the enemy to sustain both those champs in that position, so even if your primary target does survive and is healed, you can often still kill the secondary and/or tertiary target. The reason the axeman needs to be hitting multiple targets with his ![]() is because I don't like to put the alchemist in overly dangerous positions unless I have a lot of help for him or the enemy lacks burst. This means often times I can only hit
is because I don't like to put the alchemist in overly dangerous positions unless I have a lot of help for him or the enemy lacks burst. This means often times I can only hit ![]() /
/![]() on one enemy target who has come too close or is out of position. The combo is enough to send most Champs running in the extra direction if not dead on the ground. Once that threat is dispersed you can move the alchemist into a better position or onto the high ground to use his long range to throw his combo over your front line into more disruptive AoE positions. If the axeman, bandit, and knight are harassing properly, the alchemist should pick up multiple kills at a time, or leave multiple enemies near death. Once there, the rest of the team should be able to clean up and overtake any desired positions. I rarely use the alchemist's
on one enemy target who has come too close or is out of position. The combo is enough to send most Champs running in the extra direction if not dead on the ground. Once that threat is dispersed you can move the alchemist into a better position or onto the high ground to use his long range to throw his combo over your front line into more disruptive AoE positions. If the axeman, bandit, and knight are harassing properly, the alchemist should pick up multiple kills at a time, or leave multiple enemies near death. Once there, the rest of the team should be able to clean up and overtake any desired positions. I rarely use the alchemist's ![]() , it is very weak, and should only be used when a kill is assured. It is frequently faster and more beneficial to save the energy and just use an
, it is very weak, and should only be used when a kill is assured. It is frequently faster and more beneficial to save the energy and just use an ![]() to secure it in one shot. The reason for the name "Chase the Alchemist OP Game", aside from a fun match I had with PwnLaw, is because after everything I just told you, you can imagine they don't want to let your alchemist do too much work. Sometimes it is necessary to kite you alchemist around to a more protected location if multiple targets approach and you don't have the means to protect him. Often time if this happens your other units should have an advantage and be able to get a kill in the enemy back line, or set up in the strongest position possible. In most 1v1 situations with the alchemist and an enemy, your alchemist should be positioned to receive a heal, but the enemy should be overxtended and unable to receive much support. This means your alchemist should be able to get a kill in those 1v1 situations. One of my favorite things about the alchemist is that even if an enemy is out of range, you can still hit them if they are on a side of your max range, this gives him a deceptively long range. The con to this is that yes, good players can dodge you, but this is often times at a cost of their own energy or position. And in my opinion this is outweighed by the fact that your AoE cannot hit your own squad.
to secure it in one shot. The reason for the name "Chase the Alchemist OP Game", aside from a fun match I had with PwnLaw, is because after everything I just told you, you can imagine they don't want to let your alchemist do too much work. Sometimes it is necessary to kite you alchemist around to a more protected location if multiple targets approach and you don't have the means to protect him. Often time if this happens your other units should have an advantage and be able to get a kill in the enemy back line, or set up in the strongest position possible. In most 1v1 situations with the alchemist and an enemy, your alchemist should be positioned to receive a heal, but the enemy should be overxtended and unable to receive much support. This means your alchemist should be able to get a kill in those 1v1 situations. One of my favorite things about the alchemist is that even if an enemy is out of range, you can still hit them if they are on a side of your max range, this gives him a deceptively long range. The con to this is that yes, good players can dodge you, but this is often times at a cost of their own energy or position. And in my opinion this is outweighed by the fact that your AoE cannot hit your own squad.
Bandit[ | ]

This brings us to the Bandit. The bandit was the last member I used to fill out the squad, though it has a very particular fit. The bandit is the tankiest champ in the game right now that has a ranged basic attack. With having the alchemist in the front line, the team was a little squishy in general. The high mobility of the bandit lets you move her out quick, usually to a side energy tile. Often the bandit wont stay there for long, generating enough energy to use ![]() , or to move further into a side or back flanking position. The bandit is often capable of taking an energy that is closer to the enemy team if the enemy doesn't have the mobility to get there. This is usually very beneficial, and often times I get there as the enemy tries to move someone there, resulting in a loss of their energy. It is important to get the shield from
, or to move further into a side or back flanking position. The bandit is often capable of taking an energy that is closer to the enemy team if the enemy doesn't have the mobility to get there. This is usually very beneficial, and often times I get there as the enemy tries to move someone there, resulting in a loss of their energy. It is important to get the shield from ![]() up as soon as possible. Once you have it, the bandit becomes about as tanky as your axeman and a much more difficult target. This allows you to move the bandit into very dangerous positions in the side or the back, that can line up
up as soon as possible. Once you have it, the bandit becomes about as tanky as your axeman and a much more difficult target. This allows you to move the bandit into very dangerous positions in the side or the back, that can line up ![]() on multiple targets, or even attacks on a low health or squishy target. Essentially, the range allows the bandit to hit diagonal targets, therefor not needing to be directly in front of someone, that way your knight and axeman can hopefully be there dealing damage as well. You can also shoot through enemies with your basic attack to hit squishy targets in the back. Multiple basic attacks with no heal on a cleric, archer, or sorceress will put them at risk of death. The high mobility and high energy regeneration fits well because the bandit can escape dangerous situations if enemies turn on her(with
on multiple targets, or even attacks on a low health or squishy target. Essentially, the range allows the bandit to hit diagonal targets, therefor not needing to be directly in front of someone, that way your knight and axeman can hopefully be there dealing damage as well. You can also shoot through enemies with your basic attack to hit squishy targets in the back. Multiple basic attacks with no heal on a cleric, archer, or sorceress will put them at risk of death. The high mobility and high energy regeneration fits well because the bandit can escape dangerous situations if enemies turn on her(with ![]() up you have more than enough time to escape or heal). The bandit can also chase low health runners, or overtake positions in the enemy back line as you force them to retreat. The real key with the bandit is to try and hit multiple enemies with
up you have more than enough time to escape or heal). The bandit can also chase low health runners, or overtake positions in the enemy back line as you force them to retreat. The real key with the bandit is to try and hit multiple enemies with ![]() . When combined with the axeman's
. When combined with the axeman's ![]() , and the combo from the alchemist, the enemy is usually hurting from multiple fronts. Multiple enemies at low health means multiple kill opportunities which means an easy cycle into center and map control. I probably use the bandit's
, and the combo from the alchemist, the enemy is usually hurting from multiple fronts. Multiple enemies at low health means multiple kill opportunities which means an easy cycle into center and map control. I probably use the bandit's ![]() the most of the champs in my squad. It is solid ranged damage, great for snagging kills. Though as mentioned, great when you can
the most of the champs in my squad. It is solid ranged damage, great for snagging kills. Though as mentioned, great when you can ![]() multiple enemies.
multiple enemies.
Cleric[ | ]
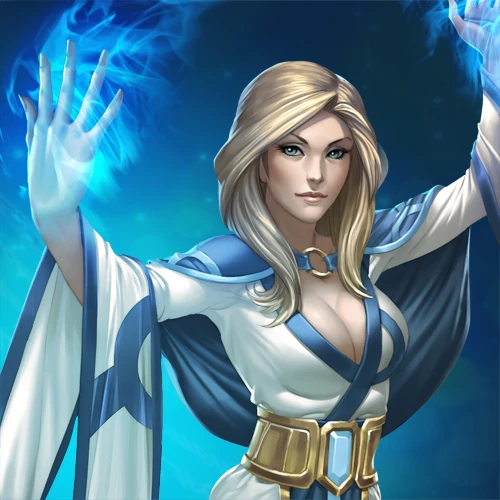
Last, but far from least, we have our two Clerics. Our clerics are obviously our only real support/heals. I prefer the double cleric, because they can be set up in ways that allow you to cast ![]() nearly anywhere in the map. This is the real key to victory with this setup. In the early game the clerics are very slow to get moving, and very energy hungry. It is difficult to get them into good positions, that is why cycling is so important. You should get your clerics on backline energy tiles, or high ground. This allows you the most vision to
nearly anywhere in the map. This is the real key to victory with this setup. In the early game the clerics are very slow to get moving, and very energy hungry. It is difficult to get them into good positions, that is why cycling is so important. You should get your clerics on backline energy tiles, or high ground. This allows you the most vision to ![]() your team. Once you have enough energy to make it to a center energy tile, you either move your current person off the energy tile to cycle your cleric in, or use the knight to
your team. Once you have enough energy to make it to a center energy tile, you either move your current person off the energy tile to cycle your cleric in, or use the knight to ![]() an enemy from their tile to cycle in. If the game has been rough, and you don't have center, sometimes you need to get your
an enemy from their tile to cycle in. If the game has been rough, and you don't have center, sometimes you need to get your ![]() up early on someone in the front line(Axeman or Knight). I almost never
up early on someone in the front line(Axeman or Knight). I almost never ![]() my bandit, because of the defense caps and the bandit's
my bandit, because of the defense caps and the bandit's ![]() . Having a shield on your tanks when they are in the mix taking a lot of damage, makes them very durable, and allows you to get heals going even if your cleric isn't on an energy tile. If the alchemist is in a lot of trouble I will always
. Having a shield on your tanks when they are in the mix taking a lot of damage, makes them very durable, and allows you to get heals going even if your cleric isn't on an energy tile. If the alchemist is in a lot of trouble I will always ![]() him when possible. If I am about to cycle a cleric onto a center energy tile and I have the available energy on my 2nd cleric, I like to
him when possible. If I am about to cycle a cleric onto a center energy tile and I have the available energy on my 2nd cleric, I like to ![]() the cycling cleric with the 2nd cleric right before. This allows the cleric to be durable upon entering the dangerous middle area of the map. If I can't do this I don't like to use one cleric to shield the other cleric, because it means if one cleric dies, you lose both. Also, don't be afraid to use the cleric's
the cycling cleric with the 2nd cleric right before. This allows the cleric to be durable upon entering the dangerous middle area of the map. If I can't do this I don't like to use one cleric to shield the other cleric, because it means if one cleric dies, you lose both. Also, don't be afraid to use the cleric's ![]() in order to last hit for a kill, I receive a lot of kills that way especially near the end of the game.
in order to last hit for a kill, I receive a lot of kills that way especially near the end of the game.
Winning the Game[ | ]
Once you get your clerics on the center tiles and gain map control you will have the energy regen and ![]() range to keep most your units out of trouble. In this situation your enemy will usually try and do something about the clerics. Unless your enemy completely ignores them for another unit, you should eventually have each cleric shield them self (so you don't lose both upon one cleric's death). If they do ignore your clerics, you are free to shield the member of your squad who needs it. Once the clerics each have
range to keep most your units out of trouble. In this situation your enemy will usually try and do something about the clerics. Unless your enemy completely ignores them for another unit, you should eventually have each cleric shield them self (so you don't lose both upon one cleric's death). If they do ignore your clerics, you are free to shield the member of your squad who needs it. Once the clerics each have ![]() , they will be able to take any damage put out by healing each other up. With the shield they can take a few hits, so you will have the time to
, they will be able to take any damage put out by healing each other up. With the shield they can take a few hits, so you will have the time to ![]() the rest of your squad as well. As long as you don't get lazy, and don't let them control you the game is almost assured from there. Nuke with your alchemist, kite when needed, and eventually push the enemy into terrible positioning. The game gets really easy when you take map control. Here is how I look at it. Once you are set up and have your shields up, the only squishy target is your alchemist, and his range allows him to stay out of danger more easily. Be aggressive and don't let back!
the rest of your squad as well. As long as you don't get lazy, and don't let them control you the game is almost assured from there. Nuke with your alchemist, kite when needed, and eventually push the enemy into terrible positioning. The game gets really easy when you take map control. Here is how I look at it. Once you are set up and have your shields up, the only squishy target is your alchemist, and his range allows him to stay out of danger more easily. Be aggressive and don't let back!
The First Move[ | ]
Earlier we discussed what cycling is, and we just talked about the importance of taking control of the map. But how do you put yourself in a position to take control? The key is your FIRST MOVE! I can't exaggerate the importance of your opening sequence. With this squad you have the ability to take 4 or even 5 of the energy tiles from the opponent in the first few moments of the game. This means they can only have 1 or 2 max. Getting this advantage very early in the game and capitalizing on it makes it nearly impossible for your opponent to come back... barring your own mistakes. When you have all the extra energy it becomes really easy to start moving your squad into whatever position you want.
Dealing with Death[ | ]
DONT BE AFRAID of a squad member dying. Sometimes it is okay to let someone like your knight or axeman perish in battle. Why knight and axeman? These two units, and the bandit, are very high mobility, and even after they die, can rejoin the battle and regain position quickly. When ? A good example is if you must choose between them or a cleric/alchemist, you should generally try and keep the squishy up. A better example is if allowing a knight to die will easily allow you to cycle your cleric into place. As mentioned, the knight can get back into a defensive position quickly.
Campaign Success & Army Placement[ | ]
Before we started I mentioned my success with the campaign using this comp. I will note here, that I did occasionally change the order of my units while completing the campaign. This was done for advantages on specific maps, mainly allowing the alchemist a better start. I never substituted squad members for other members though. If you use everything this guide should teach properly. You should be able to hone your skills in the campaign and eventually dominate in PvP. Campaign AI usually start specific ways depending how you start, so you get to work on your opening sequences, finding the ones that work best in each situation. When you gain control against the AI it often seems to panic, so you will know when you are being successful. In order to get 3 stars I did occasionally need to let a knight die so I could take map control, having the limited available deaths required to get 3-stars really teaches you when it is and isn't okay to let someone die.
Rounding Out[ | ]
Now you have almost everything you need minus maybe the champs and the experience. Below I have screenshots of different compositions of these units that I used in the campaign, and screenshots of favorable opening sequences, cycling options, and map control with brief descriptions. I hope overall this guide has been helpful to you in some way, please feel free to private message me with any questions/feedback you may have at DrCptSexyPants on the forums. I'd be happy to help and discuss anything with you!
Contributors[ | ]
Guide by: DrCptSxyPnts Editing By: Shuu